KB03: Getting Started with RAD Studio and Docker Support
KB03-1: Docker Desktop for Windows
Docker with WSL-2
Docker with Hyper-V
Step 1: Enable Hyper-V on Windows
There are three methods to install Hyper-V on Windows
- Enable Hyper-V using PowerShell
- Open a PowerShell console as Administrator.
- Run the following command:
Enable-WindowsOptionalFeature -Online -FeatureName Microsoft-Hyper-V -All - When the installation completes, reboot.
- Enable Hyper-V with CMD and DISM
- Open up a PowerShell or CMD session as Administrator.
- Type the following command:
DISM /Online /Enable-Feature /All /FeatureName:Microsoft-Hyper-V
- Enable the Hyper-V role through Settings
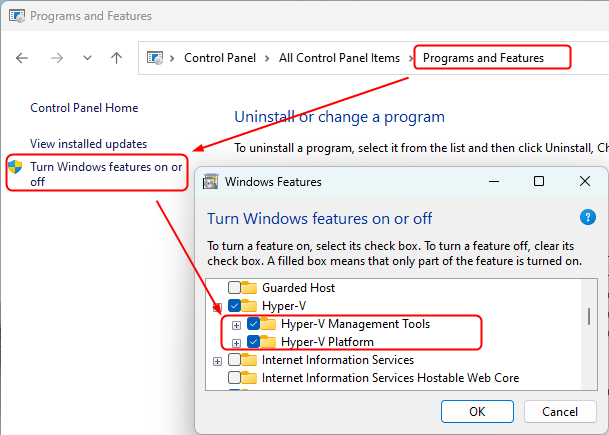
- Navigate to the Control Panel.
- Select Programs, then Programs and Features.
- Select Turn Windows Features on or off.
- Select Hyper-V and then select OK.
Step 2: Create a New Virtual Machine in Hyper-V
- Open Hyper-V Manager
- Create a New VM
- Start the VM
Step 3: Set up a Virtual Switch (if not already done)
- Create a Virtual Switch
- Assign the Switch to the VM
Step 4: Install Docker in the VM (Linux)
- Update the APT Package Index:
sudo apt-get update - Install Required Packages:
sudo apt install apt-transport-https ca-certificates curl software-properties-common - Add Docker's GPG Key:
curl -fsSL https://download.docker.com/linux/ubuntu/gpg | sudo gpg --dearmor -o /usr/share/keyrings/docker-archive-keyring.gpg - Add the Docker Repository:
echo "deb [arch=amd64 signed-by=/usr/share/keyrings/docker-archive-keyring.gpg] https://download.docker.com/linux/ubuntu $(lsb_release -cs) stable" | sudo tee /etc/apt/sources.list.d/docker.list > /dev/null - Install DOcker
sudo apt update
sudo apt install docker-ce - Check Docker Installation:
sudo systemctl enable docker - Enable Docker to Start on Boot:
sudo systemctl enable docker
Step 5: Verify Docker Setup with a Test Container
- Run Hello World Container:
sudo docker run hello-world - This command will pull the "hello-world" image from Docker Hub and run it, confirming Docker is working correctly.
Step 6: Enable Nested Virtualization (Optional)
If you need Docker within the VM to run other virtualization tools, enabling nested virtualization can help:
- Enable Nested Virtualization for the VM:
- Shut down the VM.
- Run the following command in PowerShell (Admin):
Set-VMProcessor -VMName "Your_VM_Name" -ExposeVirtualizationExtensions $true
Additional Commands
- Check Docker Service Status:
sudo systemctl status docker - Start Docker Manually:
sudo systemctl start docker - Restart Docker:
sudo systemctl restart docker
KB03-2: Docker for Linux
Step1: Pull the Docker image:
To start using RAD Studio with Linux Docker support, download the appropriate Docker image from Docker Hub. There are three options, each tailored to different levels of functionality:
PAServer-Docker
PAServer-Docker: Just PAServer on Ubuntu
- Description: This image includes only the PAServer on an Ubuntu environment, which is suitable for RAD Studio deployments.
- Ports:
- PAServer: Port 64211
- Broadwayd: Port 8082
- Resources:
- Docker Hub: https://hub.docker.com/r/radstudio/paserver
docker pull radstudio/paserver:latest - GitHub Repository: https://github.com/Embarcadero/paserver-docker
- Report Issues: https://github.com/Embarcadero/paserver-docker/issues
- Docker Hub: https://hub.docker.com/r/radstudio/paserver
PA-RADServer-Docker
PA-RADServer-Docker: With RAD Server
- Description: It includes RAD Server and PAServer, which are ideal for applications requiring RAD Server functionality.
- Ports:
- PAServer: Port 64211 (password securepass)
- Apache: Port 80
- Broadwayd: Port 8082
- Resources:
- Docker Hub: https://hub.docker.com/r/radstudio/pa-radserver
docker pull radstudio/pa-radserver:latest - GitHub Repository: https://github.com/Embarcadero/pa-radserver-docker/
- Report Issues: https://github.com/Embarcadero/pa-radserver-docker/issues
- Docker Hub: https://hub.docker.com/r/radstudio/pa-radserver
PA-RADServer-IB-Docker
PA-RADServer-IB-Docker: With RAD Server and InterBase
- Description: A comprehensive image that includes both RAD Server and InterBase, suitable for applications requiring database support.
- Ports:
- PAServer: Port 64211 (password securepass)
- Apache: Port 80
- Broadwayd: Port 8082
- RAD Server database (Interbase): Port 3050.
- Resources:
- Docker Hub: https://hub.docker.com/r/radstudio/pa-radserver-ib
docker pull radstudio/pa-radserver-ib:latest - GitHub: https://github.com/Embarcadero/pa-radserver-ib-docker/
- Report Issues: https://github.com/Embarcadero/pa-radserver-ib-docker/issues
- Docker Hub: https://hub.docker.com/r/radstudio/pa-radserver-ib
Step 2: Run the Container:
Run the Docker container, mapping the necessary ports and volumes.
- PAServer-Docker:
docker run -itp 64211:64211 radstudio/paserver:latest - PA-RADServer-Docker:
docker run -it --mount source=ems2,target=/etc/ems -e DB_PORT=3050 -e DB_HOST=167.71.115.5 -p 80:80 -p 64211:64211 -p 8082:8082 radstudio/pa-radserver:latestdocker run -itp 64211:64211 radstudio/pa-radserver:latest - PA-RADServer-IB-Docker:
docker run -d -e CONFIG=INTERBASE -p 3050:3050 --mount source=interbase,target=/opt/interbase --mount source=ems,target=/etc/ems radstudio/pa-radserver-ibdocker run -itp 64211:64211 radstudio/pa-radserver-ib:latest
Step 3: Create a Linux Connection Profile
Follow these steps to set up a Linux profile in the RAD Studio IDE:
- Open RAD Studio
- Launch
 RAD Studio 12.
- Launch
- Navigate to the Connection Profile manager
- Go to Click Tools ➤ Options.
- Under the Deployment section, select Connection Profile Manager.
s
- Add a New Connection Profile
- Click on Add... to open the Create a Connection Profile wizard.
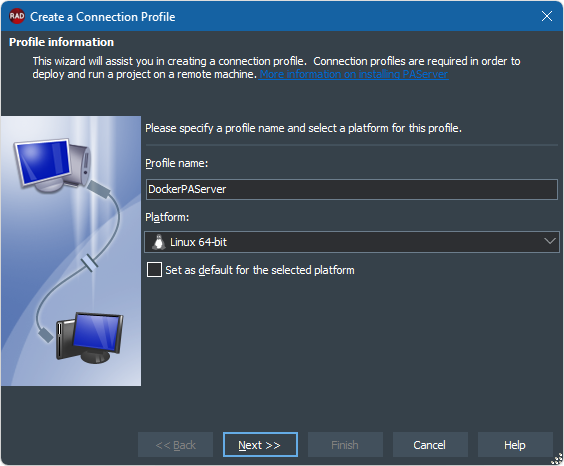
- Enter Profile Information
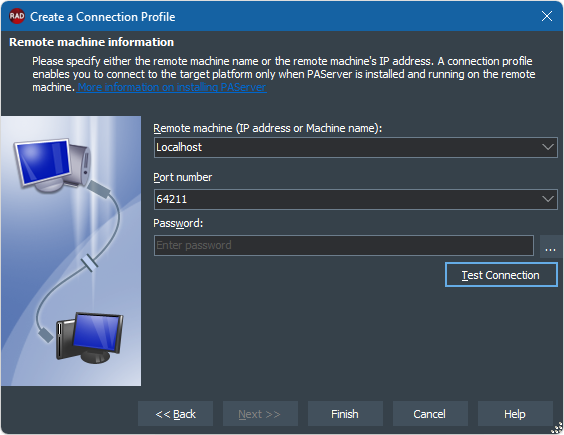
- Specify Remote Machine Information
- Complete the Configuration
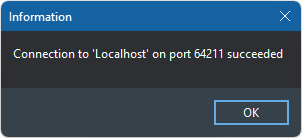
- If the connection test is successful, click Finish to complete the setup.
Step 4: Add the Installed SDK to RAD Studio
To continue setting up your Linux environment in RAD Studio, follow these steps to add the SDK:
- Open SDK Manager
- Navigate to Tools ➔ Options ➔ Deployment ➔ SDK Manager.
- Add a New SDK
- Click on the Add... button to open the Add a New SDK dialog.
- Configure SDK Details
- In the "Select a platform" field, choose "Linux 64-bit".
- Choose the previously created profile from the drop-down list in the "Select a profile to connect" field, such as DockerPAServer, (Host: 'localhost', Port Number: '64211').
- The SDK name should automatically appear if installed in the "Select an SDK version" field.
- If the SDK is not installed, you can install it at this step.
- If the SDK is already present, proceed to the next step.
Your SDK has now been added to RAD Studio and is ready for use.
Step 5: Stop the Docker container
To stop a running Docker container, you can use the following command in your terminal:
docker stop <container_id_or_name>Steps:
- Find the Container ID or Name (if you do not know it):
- Use the command:
docker ps - This lists all running containers along with their IDs and names.
- Use the command:
- Stop the Container:
- Replace <container_id_or_name> with the actual container ID or name you identified:
docker stop my_container
- Replace <container_id_or_name> with the actual container ID or name you identified:
This command sends a stop signal to the container, allowing it to terminate gracefully. If you want to force-stop it, you can use:
docker kill <container_id_or_name>This will stop the container immediately.
program Project1;

{$APPTYPE CONSOLE}

{$R *.res}

uses
  System.SysUtils;

begin
  try
    { TODO -oUser -cConsole Main : Insert code here }
    Writeln('Hi Linux!!! ... How are you Docker???');
  except
    on E: Exception do
      Writeln(E.ClassName, ': ', E.Message);
  end;
end.
KB03-3: Docker for macOS
Docker with WSL2
Docker with WSL2
Docker with Hyper-V
Docker with Hyper-V
- Enable Nested Virtualization in Hyper-V
- Turn off the DockerDesktopVM virtual machine and run the following command on the physical Hyper-V host to enable nested virtualization for the virtual machine.
Set-VMProcessor -VMName <VMName> -ExposeVirtualizationExtensions $true
- Turn off the DockerDesktopVM virtual machine and run the following command on the physical Hyper-V host to enable nested virtualization for the virtual machine.
- Install an X Server on Windows
- Set up the DISPLAY Environment Variable in Docker
- Find your Windows host's IP address:
Use ipconfig in a command prompt to get the IP address of your Windows machine. - Set the DISPLAY environment variable:
When running your Docker container, use the -e flag to set the DISPLAY variable:docker run -e DISPLAY=<your_windows_ip>:0.0 <image_name> - Alternatively, you can set it inside the container using the command:
export DISPLAY=<your_windows_ip>:0.0
- Find your Windows host's IP address:
Configure SSH Client for X11 Forwarding:
Open your SSH client settings:
Enable X11 forwarding:
Look for an option like "Enable X11 forwarding" or "X11 forwarding" and check it.
Key points to remember:
Firewall rules:
Make sure your Windows firewall allows incoming connections on the X server port (usually 6000).
Authentication:
If you encounter issues, verify that your SSH client is properly configured to authenticate against your Docker host.
Testing:
After setting up, try running a graphical application within your Docker container to confirm if it displays correctly on your Windows desktop.
Install Docker-OSX
docker run -it \
--device /dev/kvm \
-p 50922:10022 \
-v /tmp/.X11-unix:/tmp/.X11-unix \
-e "DISPLAY=${DISPLAY:-:0.0}" \
-e GENERATE_UNIQUE=true \
-e MASTER_PLIST_URL='https://raw.githubusercontent.com/sickcodes/osx-serial-generator/master/config-custom.plist' \
registry.cn-hangzhou.aliyuncs.com/shrimp-images/docker-osx:ventura

docker build -t docker-osx .
