Lab 12: PSpice: Time Domain Analysis
Objective
- Use PSpice Circuit Simulator to simulate circuits containing capacitors and inductors in the time domain.Use PSpice Circuit Simulator to simulate circuits containing capacitors and inductors in the time domain.
- Practice using a switch, and a Pulse & Sinusoidal voltage source in R-L and R-C circuits.
Equipments
- PSpice Program
Background
The inputs to an electric circuit have generally been independent voltage and current sources. PSpice provides a set of voltage and current sources that represent time varying inputs. “Time Domain (Transient)” analysis using PSpice simulates the response of a circuit to a time varying input. Time domain analysis is most interesting for circuits that contain capacitors or inductors. For the capacitor, the part properties of interest are the capacitance and the initial voltage of the capacitor (the “Initial Condition”). For the inductor on the other hand, the part properties of interest are the inductance and the initial current of the inductor (the “Initial Condition”).
In this lab we consider three examples. The first example illustrates transient analysis of a R-L circuit with s single switch; the second and third circuits analyzed are the response of an R-C circuit to a Pulse voltage source and a sinusoidal voltage source.
We will again use a five-step procedure to organize circuit analysis using PSpice.
Procedure
Exp #1: Transient Analysis of an R-L Circuit with a Switch
Time varying voltages and currents can be caused by opening or closing a switch. PSpice provides parts to represent Single-Pole Single-Throw (SPST) switches in the parts library. These parts are summarized below:
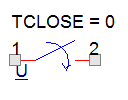
PSpice Component Name: Sw_tCLOSE
Description: The switch will be closed at t = TCLOSE
Library: eval.olb
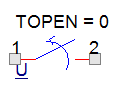
PSpice Component Name: Sw_tOPEN
Description: The switch will be opened at t = TOPEN
Library: eval.olb
PSpice Problem
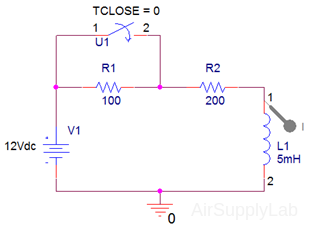
The circuit shown is at steady state before the switch closes at time t = 0.
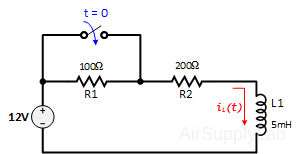
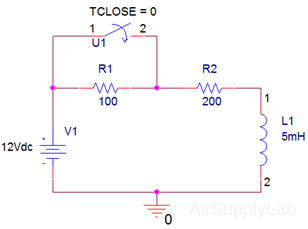
The current in the inductor before the switch is closed is iL(t = 0) = 40 mA. Find the current of the inductor as a function of time after the switch closes. That is, use PSpice to simulate the circuit after the switch closes.
Analytical Solution:
set iL(0−) = 40 mA and ISC = 60 mA.
\({i_L}(t) = {I_{SC}} + \left( {{i_L}({0^ - }) - {I_{SC}}} \right){e^{ - t/\tau }} = (60 - 20{e^{ - 40000t}})\;mA\)
Where \(\tau = \frac{L}{{{R_{TH}}}} = 25\mu S\)
- Formulate a circuit analysis problem
After the switch closes the circuit’s time constant is 25 μs. Plot the inductor current, iL(t), for the first 150 μs (6 time constants) after the switch closes. - Describe the circuit using Capture
- Place all parts on the schematic page.
- The polarized inductor can be found in analog_p.olb library and it has terminal points 1 & 2 that indicate a positive and negative polarity, respectively. Set the initial condition iL(0−) = 40 mA. That is, double click on the inductor. The property editor will open. The column labeled "IC" (for Initial Condition) is used to enter the initial inductor current. Enter 40mA in this column, then close the property editor.
- Simulate the circuit using PSpice
- Select PSpice ➤ New Simulation Profile. Name the profile "Transient". Select "Time Domain (Transient)" for the Analysis Type.
- There are several other information settings for the transient analysis. Run to time is the length of time that the simulation will run. The simulation starts at time zero and ends at the "Run to time". In this case, specify the "Run to time" as \(6{\tau _{RL}} = 150\mu S\) and run it.
- Do not change the default setting of zero for the time that the data starts being saved.
- Click OK.
- Probes
Before running the simulation, we need to mark the voltages and/or currents that we want to display with probes.- Select PSpice ➤ Markers ➤ Current Into Pin, and place the prob that appears at the top of the inductor.
- Your circuit should now appear as shown in the following diagram:
- Running and Displaying the Results of the Simulation
- After a successful simulation, a Probe window will automatically open.
- Delete Trace
Click on the I(L1) icon (the text) at the bottom left of the simulation windows, and press delete key to delete it. - Adding Trace and Plotting Expression
We will add black the trace for I(L1:1) to show another way of plotting traces.
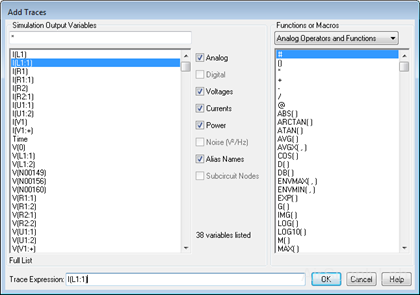
- Select Trace ➤ Add Trace... , or right click on the curve line and select Add Trace or click
 button on the toolbar.
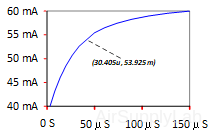
 - Add trace I(L1:1) (the current through inductor L1 through node 1)
- Select Trace ➤ Add Trace... , or right click on the curve line and select Add Trace or click
- To remove grid lines from the plot, right-click on the plot and select Settings.... Under the X Grid and Y Grid tabs, select None on Major and Minor grid.
- Using Cursors
Cursors can be used to determine precise simulation values.
- To active the cursors, click on the
 Toggle Cursor icon at the top of the simulation window.
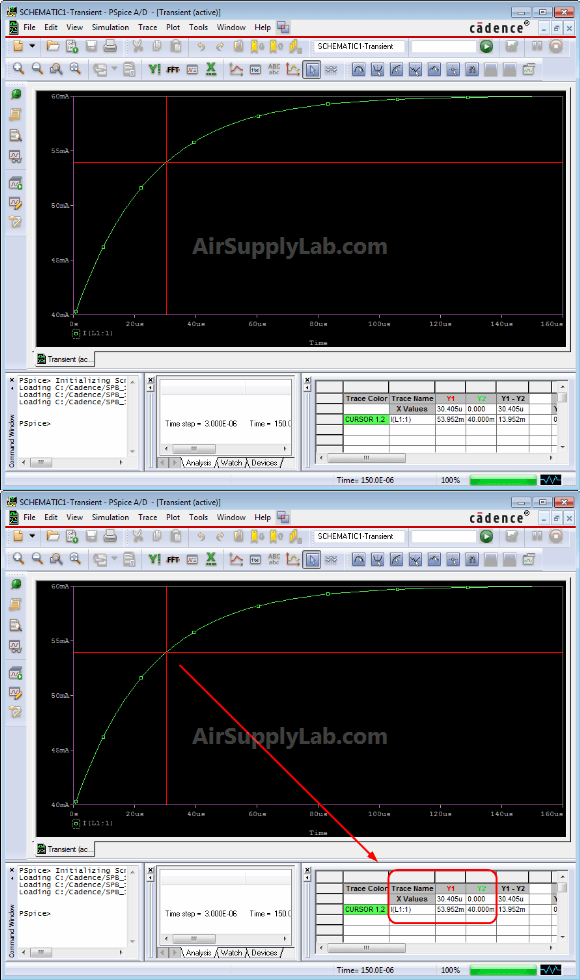
 - At the bottom of the window you may have to resize the cursor window to display data. There are two cursors Y1 and Y2. Y1 is controlled with the left mouse and Y2 with the right.
- Click on the
 Search Cursor icon, then type in the commands: SFXV(xvalue) for X-Values or SFLE(yvalue) for Y-Values. For example: type SFXV(30.405uS).
- Crosshairs will be shown on the screen. X and Y values for this trace at the position of the cross hairs are displayed in the small Cursor window previously uncovered.
- To active the cursors, click on the
- To change the color or thickness of a line, you can right click on the curve line and select Trace Property.
- To copy this plot go to the “Window” tab on the tool bar and select “copy to clipboard” and paste into your document.
- Verify that the simulation results are correct
The initial response of the inductor current is iL(0−) = 40 mA and its final state current is ISC = iL(∞) = 60 mA. Verify that the plot agrees with the mathematical prediction.
To ask a more detail questions such as what is the value of iL(t) at a time of 30.405 μs, there are several tools that are at our disposal: the Probe cursor button and Mark Data points & adjust value buttons allow one to select a particular data value on the curve.
To find the current at t = 30.405 μs, one can find that the plot indicates that iL(t) = 53.592 mA when t = 30.405 μs. Substituting t = 30.405 μs into the complete natural response gives iL(t) = 54.073 mA, a difference of 0.5%. The simulation results are correct.
Exp #2: The Response of an RC Circuit to a Pulse Input
PSpice Problem
The source voltage and R-C circuit are
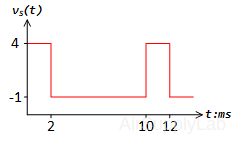
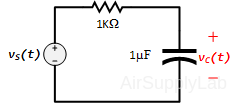
Use PSpice to simulate the voltage source and the capacitor’s voltage vC,PS(t) and compare it to theoretical prediction
\({v_{C,thy}}(t) = \left\{ \begin{array}{l} 4 \times (1 - {e^{ - 1000t}}) & ,0 < t < 2ms\\ - 1 + 4.46{e^{ - 1000(t - 0.002)}} & ,2ms < t < 10ms \end{array} \right.\)
- Formulate a circuit analysis problem
Plot three voltages simultaneously: vS(t), vR(t) and vC(t) vs t. - Describe the circuit using Capture
Place the parts, adjust parameter values and wire the parts together.- From the source.olb parts library, choose the VPULSE part and place it in the schematic drawing window. Or you can add it from Place ➤ PSpice Component... ➤ Source ➤ Voltage Sources ➤ Pulse.

V1 — Initial voltage voltage level
V2 — Voltage after the switch (Note: V2 can be less than V1)
TD — Delay time before the first transition from V1 to V2
TR — Rise time in going from V1 to V2. (It is still TR, even if the V1 > V2)
TF — Fall time in going from V2 to V1
PW — Pulse width: time that the voltage is at the V2 level
PER — Period: the time for one cycle of the pulse wave form. The source will repeat the pulse for as long as the simulation runs, as defined in the simulation set up.- The plot of vS(t) shows making the transition from -1 V to 4 V instantaneously. Zero is not an acceptable value for the parameters TR or TF. Choosing very small value for TR and TF will make the transitions appear to be instantaneous when using a time scale that shows a period of the source waveform. In this example, the period of the source waveform is 10 ms so 1 ns is a reasonable choice for the values of TR and TF.
- Set TD, the delay before the periodic part of the waveform, to zero. Then the values of V1 and V2 are -1 and 4, respectively. The value of PW is the length of time that V2 = 4V, so PW = 2 ms in this example. The value of per is the period of the pulse function, 10 ms
- From the analog.olb library, add a resistor and a PSpice Ground. Place a polarized capacitor from analog_p.olb library to the schematic, and connect node-1 to positive polarity. Wire all parts together as shown below:
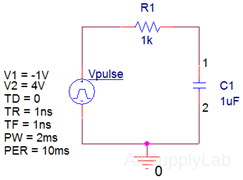
Nodes:
Can be given more convenient names using an off-page connector component: OFFPAGELEFT-R or OFFPAGELEFT-L by clicking Place ➤ Off-Page Connector, or button. Edit the properties naming each connector with “SOURCE” and “CAP.”
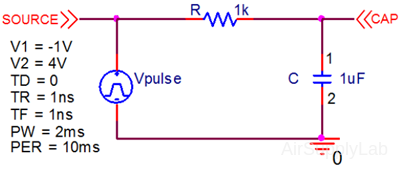
- From the source.olb parts library, choose the VPULSE part and place it in the schematic drawing window. Or you can add it from Place ➤ PSpice Component... ➤ Source ➤ Voltage Sources ➤ Pulse.
- Simulate the circuit using PSpice
- Select PSpice ➤ New Simulation Profile. Name the profile "ResponsePulse". Select "Time Domain (Transient)" for the Analysis Type.
- In this case, specify the "Run to time" for two period (20ms).
- Check "Skip initial transient bias point calculation (SKIPBP)"
- Do not change the default setting of zero for the time that the data starts being saved.
- Click OK.
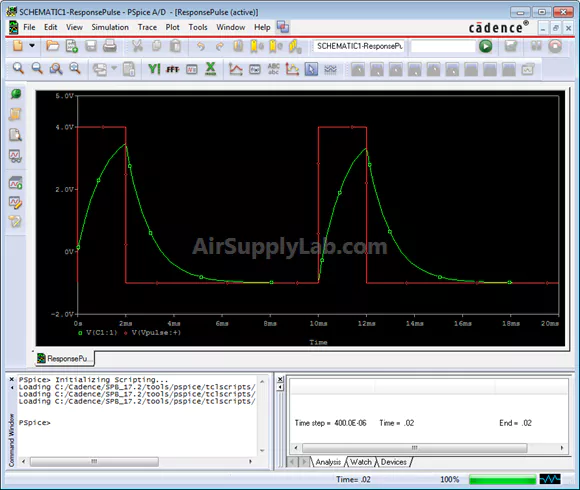
- Display the results of the simulation, for example, using Probe
Add traces V(SOURCE), V(CAP), and V(SOURCE)−V(CAP).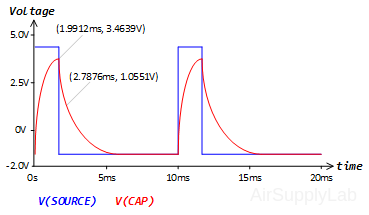 Go back and change the pulse width to 5 ms. How do the resulting plots look like?
 - Verify that the simulation results are correct
To verify the results, label four points (two from each RC curve) and check with the predictions of the complete natural response. I’ve done two of them, now you check the other two listed in the table below.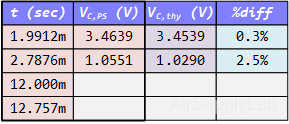
Exp #3: The Response of an RC Circuit to a Sinusoidal Input
PSpice Problem
Use PSpice to plot the capacitor’s voltage vC,PS(t) and power PC(t) delivered to the capacitor.

where
\(\begin{array}{l} {v_C}(t) = 1.55\sin (2\pi t - 76.6^\circ )\quad V\\ {P_C}(t) = {v_C}(t) \times {i_C}(t) = 3.77\sin (40\pi t - 153^\circ )\quad W \end{array}\)
- Formulate a circuit analysis problem
Simulate the circuit to determine the capacitor voltage, vC(t). Plot the vC(t) versus t. Also, plot the power delivered to the capacitor as a function of time. - Describe the circuit using Capture
Place a polarized capacitor from analog_p.olb library on the schematic, and connect node-1 to positive polarity.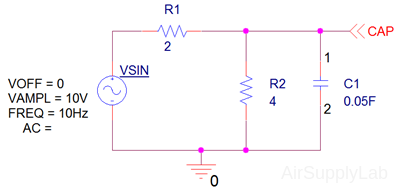
- Simulate the circuit using PSpice
Specify the run to time as 0.8 s to run the simulation for eight full periods. - Display the results of the simulation
In the Probe window, add the trace V(CAP). One observes that the plot is disappointing for a couple of reasons. First, it's a very rough representation of a sine function. Second, it takes a while for the capacitor voltage to settle down. In other words, the capacitor voltage includes a transient part as well as the steady state response. In this example, we only want the steady state response and so would like to eliminate the transient part of the response.
- To obtain a smoother plot, edit the Simulation Settings and set the "Maximum step size" to smaller step size: 0.001 s.
- The transient part of the capacitor’s voltage can be eliminated by adjusting the initial capacitor’s voltage to:
\({v_C}(t = 0) = 1.55\sin (2\pi t - 76.6^\circ )\quad V = - 1.55\sin (76.6^\circ ) = - 1.506\quad V\)
Set the initial condition (IC) of the capacitor to be this value.
With these two adjustments, the resulting plots are:
Questions
- The circuit is at steady state before the switch is thrown at t = 0.
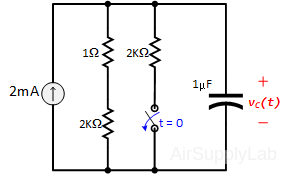
- Determine and plot the voltage across the capacitor vC(t) and the current i2kΩ(t) through the 2 kΩ resistor for t > 0. PSpice does not let you plot current and voltage simultaneous since they have different units.
- Simulate the circuit, print out the plots and explain (using short concise sentences) the behavior of the capacitor and 2 kΩ resistor using your plots.
- Turn in Exp #1, Exp #2 and Exp #3 of the PSpice lab. Make sure that you show your work for verifying the simulation results!